ImageJ pvAccess Viewer (EPICS_NTNDA_Viewer.java)
| author: | Mark Rivers, Tim Madden, Marty Kraimer |
|---|---|
| affiliation: | University of Chicago, Argonne National Laboratory |
This plugin uses EPICS V4 pvAccess to display NTNDArrays that the NDPluginPva sends to EPICS.
The EPICS_NTNDA_Viewer has a number of significant advantages compared to the EPICS_AD_Viewer:
- The NTNDArray data is transmitted “atomically” over the network, rather than using separate PVs for the image data and the metadata (image dimensions, color mode, etc.)
- NTNDArrays and pvAccess support sending compressed arrays over the network. Beginning with ADViewers R1-3 the EPICS_NTNDA_Viewer can decompress the NTNDArrays and display them. This can significantly reduce the required network bandwith when the IOC and the viewer are running on different machines.
- When using Channel Access the data type of the waveform record is fixed at iocInit, and cannot be changed at runtime. This means, for example, that if the user might want to view both 8-bit images, 16-bit images, and 64-bit double FFT images then the waveform record would need to be 64-bit double, which adds a factor of 8 network overhead when viewing 8-bit images. pvAccess changes the data type of the NTNDArrays dynamically at run-time, removing this restriction.
- Channel Access requires setting
EPICS_CA_MAX_ARRAY_BYTES, which is a source of considerable confusion and frustration for users. pvAccess does not useEPICS_CA_MAX_ARRAY_BYTESand there is no restriction on the size of the NTNDArrays. - The performance using pvAccess is significantly better than using Channel Access. NDPluginPva is 5-10 times faster than NDPluginStdArrays, and ImageJ can display 1.5-2 times more images/s with pvAccess than with Channel Access.
To use these ImageJ plugins do the following:
To use this ImageJ plugin do the following:
Install ImageJ from ImageJ download site.
Copy the entire directory
ADViewers/ImageJ/EPICS_areaDetectorto theplugins/directory in the ImageJ installation location. On OS X this can be done with the command:cp -r ADViewers/ImageJ/EPICS_areaDetector /Applications/ImageJ/plugins
The ImageJ plugins are supplied as Java source code, so you will need to compile the Java code. This can be done in the
ImageJ Plugins/Compile and Runmenu. Browse for the appropriate source file (EPICS_NTNDA_Viewer.java) to compile and run it. The compilation step only needs to be done once, creating the required .class files. After this it will appear in theImageJ/Plugins/EPICS_areaDetectormenu.For the EPICS_NTNDA_Viewer to decompress arrays these additional steps are required:
The decompression is done using the C libraries because there does not appear to be native Java code for blosc decompression, and the native Java code for jpeg decompression is signifcantly more complicated (and probably slower) than just using the C library. The required libraries on Linux are
decompressJPEG.so,libjpeg.so,libblosc.so, andlibzlib.so. On Windows the libraries aredecompressJPEG.dll,jpeg.dll,blosc.dll, andzlib.dll.These libraries can all be built as part of
areaDetector/ADSupport, and this is recommended. If the ImageJ viewers are being installed at a location which is not building ADSupport then pre-built versions of the ADSupport libraries are available at cars.uchicago.edu/software/pub/ADSupport. Both tar and zip files are available there.ImageJ needs to be able to find these shareable libraries to handle compressed arrays. One way to do this is to add
[YOUR_LOCATION]areaDetector/ADSupport/lib/linux-x86_64/to theLD_LIBRARY_PATHenvironment variable on Linux, and[YOUR_LOCATION]areaDetector/ADSupport/bin/windows-x64to thePATHenvironment variable on Windows. This assumes that ADSupport was built usingWITH_BLOSC=YES,WITH_JPEG=YES,BLOSC_EXTERNAL=NO, andJPEG_EXTERNAL=NO.In principle another way to do this is to set the jna.library.path property to point to that directory when starting ImageJ, e.g.
java -Djna.library.path=/home/epics/support/areaDetector/ADSupport/lib/linux-x86_64 -jar ij.jar
However, ImageJ is normally started via an executable file rather than a script invoking
ij.jaron both Linux and Windows, and loading via the above command requires other settings as well to make ImageJ work properly.The ADViewers distribution includes two new jar files,
jna-5.1.0.jarandjblosc-1.0.1.dev.jar. The jna file provides support for Java Native Access, which is the interface to calling the shareable libraries. The jblosc file provides a Java wrapper around the blosc shareable library. These files need to be copied toImageJ/plugins/EPICS_areaDetectoralong with the other files in theADViewers/ImageJ/EPICS_areaDetectordirectory.
This ImageJ viewer uses the pure-Java libraries for EPICS pvAccess. This means that unlike the IDL Viewer, no C-based shareable-libraries or DLLs are needed.
When using this V4 EPICS_NTNDA_Viewer it is not necessary to set
EPICS_CA_MAX_ARRAY_BYTESon either the ImageJ client or the IOC processes.Start ImageJ and go to the
Plugins/EPICS_areaDetector/EPICS_NTNDA_Viewerto run the plugin.Type in the channel name for the NDPluginPva plugin for the detector to be viewed (e.g. 13SIM1:Pva1:Image).
The background color of the channel name will change to green and you should see message saying that the channel has connected. If you don’t the most likely problem is a firewall.
Press the Start button to begin displaying images.
The control window for EPICS_NTNDA_Viewer is shown below. The channel name can be entered manually, or can be set before running ImageJ with the environment variable EPICS_NTNDA_VIEWER_CHANNELNAME. If the environment variable is not set then the channel name will be automatically restored from a settings file the next time the plugin is run. The array dimensions and the number of frames per second actually being displayed by ImageJ is shown. There is a status window that shows whether the EPICS PVs are connected and the number of arrays received since the last status update, which is every 2 seconds.
Press the Snap button to make a copy of the current frame in a new window. ImageJ can then be used to process, annotate, etc. that image.
To capture a sequence of images into an ImageJ “stack” select “Capture To Stack”. The image sequence will be stored in the ImageJ buffer and a scroll bar will appear to allow you to scroll through the images. The stack can be saved to disk in a large number of formats, including AVI.
Note that plugin automatically resets the image image brightness and contrast when creating a new window. This will often provide a reasonable values. To optimize the brightness and contrast use the Image/Adjust/Brightness/Control menu in ImageJ. The keyboard shortcut for this is Control+Shift+C, which is worth remembering. Opening the Brightness and Contrast window will first do an autoscaling, which is often quite good. Pressing the Auto button repeatedly will step through several brightness/contrast settings.
The following is the main ImageJ window.

ImageJ main window.
The following is the EPICS_NTNDA_Viewer plugin control, located in the ImageJ “Plugins/EPICS_areaDetector/EPICS NTNDA Viewer” menu.

ImageJ EPICS_NTNDA_Viewer plugin control window
The following is the image display window, which will appear when the Start button is pressed in the EPICS_NTNDA_Viewer control window.
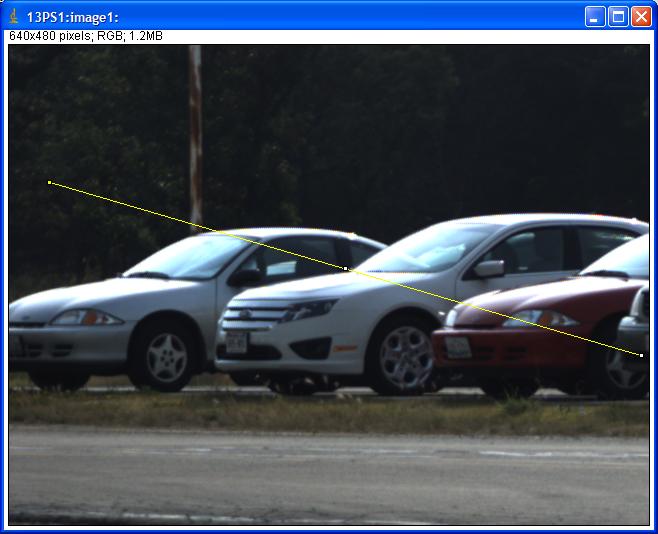
ImageJ EPICS_NTNDA_Viewer plugin display window with line selection

ImageJ EPICS_NTNDA_Viewer dynamic line profile of the above image
The following is a screen shot when using the EPICS_NTNDA_Viewer to display compressed NTNDArrays. The source is the simDetector running on a Linux machine, generating 1024x1024 UInt8 images at about 95 frames/s. This is about 95MB/s or 760 Mb/s. The NDPluginCodec is compressing using the Blosc ZSTD compressor with compression level=5 and Bit shuffle. Actually Bit shuffle does nothing in 8-bit mode, so this could also be None. There are 6 Blosc threads. The compression factor is 151, i.e. the output arrays are 151 times smaller than the uncompressed arrays. The Codec output goes to the NDPluginPva plugin which serves the NTNDArrays on the network. The ImageJ viewer is running on a Windows machine and is decompressing the arrays and displaying them at the full 95 frames/s rate. The Windows Task Manager Network Monitor shows that the actual network utilization is only 6.5 Mb/s, compared to over 760 Mb/s if we were transmitting uncompressed arrays. The Windows machine has 8 cores, and ImageJ is using approximately 1 core to decompress the arrays and update the display at 95 frames/s.

Screen ImageJ EPICS_NTNDA_Viewer on a Windows machine displaying Blosc/ZLIB compressed images